It’s a pretty long article, so here’s a table of contents:
Table of Contents
Installation
Preamble
There are many better installation guides out here on the internet, but the gist of the procedure is generally the same. The only thing you’re going to have to do some research on is the dependencies. Each Linux (or BSD) distribution is going to have different package names for each dependency.
On Void Linux:
1sudo xbps-install base-devel libX11-devel libXft-devel libXinerama-devel freetype-devel fontconfig-develAcquiring the source code
Next, create a directory where you’ll store DWMs source code. Clone the repository there:
1git clone https://git.suckless.org/dwmDmenu or ST aren’t requirements, so install those only if you want to.
Building
It’s pretty simple. Change your current directory to wherever DWM’s source code is. In a terminal, type make. Then, sudo make clean install. On any subsequent compilations, you can just use sudo make install.
You’ll need to rebuild DWM whenever you want to apply any tweaks you’ve made to its configuration!
Setup
You’ve got DWM installed, but before we start it, let’s make a quick change to the config file.
Open up config.h (located wherever you cloned the DWM source code) in a text editor. Search for “termcmd”. This sets the terminal that pops up by default. Change it to whatever your preferred terminal emulator is. I have it set as xfce4-terminal.
1static const char *termcmd[] = { "xfce4-terminal", NULL };You could, if you wanted to, throw any extra commands in there that you’d like to run whenever you open your terminal. We’ll get to writing these kinds of commands in a bit.
While we’re here, we might as well change the default modifier key. Out of the box, it’s the alt key, which may interfere with other apps. We’ll change that to the Windows/command key.
Still in config.h, search for “MODKEY”. Change whatever’s in there to Mod4Mask. No need to patch or anything.
1#define MODKEY Mod4MaskFirst run
You’ll see an almost blank screen, save for a bar at the top. The main thing you’re going to want to do now is open a terminal. You can do this by pressing MODKEY+Shift+Enter.
We’ll start tweaking our configuration file now.
Getting function keys to work
Nothing difficult at all!
At the top of config.h, add this line: #include <X11/XF86keysym.h>.
Keybindings in DWM work as such: you have to define a command first (this happens separately), then you bind that command to a key.
The main function keys I need are for brightness, volume and media control. We’ll set that up now.
Brightness
Here’s how we’ll do brightness control. First, you’ll have to install a package, which generally goes by the name of brightnessctl. If you happen to get permission errors when running the program, you’ll need to add your current user to the video group. We’ll do that as such: usermod -aG video $USER. Use root privilages if needed. You may need to reboot.
Pop these two lines into your config.h:
1static const char *brighter[] = { "brightnessctl", "set", "10%+", NULL, };
2static const char *dimmer[] = { "brightnessctl", "set", "10%-", NULL, };
You can change the name of the commands if you’d like.
Now we’ll bind the relevant keys to these commands. You’ll find a section in your configuration file like this:

We’ll define our own keybindings at the bottom of this list, underneath this area:
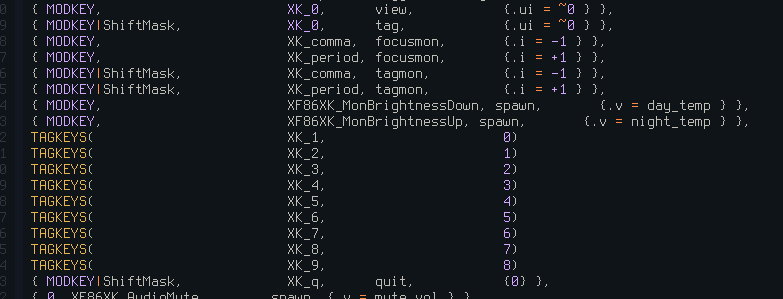
Pop these two lines down:
1{ 0, XF86XK_MonBrightnessDown, spawn, { .v = dimmer } },
2{ 0, XF86XK_MonBrightnessUp, spawn, {.v = brighter} },
The leading 0 is present so that we don’t need a modifier key to run these commands. Make sure you don’t forget the comma at the end!
Volume
I can’t say for sure if this works with Pipewire. I happen to use Pulseaudio on my machine, and I do know that these commands work here. Under the commands section of your configuration file:
1static const char *up_vol[] = { "pactl", "set-sink-volume", "@DEFAULT_SINK", "+5%", NULL };
2static const char *down_vol[] = { "pactl", "set-sink-volume", "@DEFAULT_SINK@", "-5%", NULL };
3static const char *mute_vol[] = { "pactl", "set-sink-volume", "@DEFAULT_SINK@", "toggle", NULL };
Then, wherever your keybindings are:
1{ 0, XF86XK_AudioMute, spawn, { .v = mute_vol } },
2{ 0, XF86XK_AudioLowerVolume, spawn, { .v = down_vol } },
3{ 0, XF86XK_AudioRaiseVolume, spawn, { .v = up_vol } },
Media keys
There are a few ways you could go about this.
Are you a user of MPD?
No? Move on to the next section.
If you are, you have two options. If you’re like me and just want your media keys to do nothing but play/pause audio from MPD, then we’ll do the following.
Firstly, install mpc. The commands we’ll use are:
mpc togglempc nextmpc prev
1static const char *playpause[] = { "mpc", "toggle", NULL };
2static const char *nextsong[] = { "mpc", "next", NULL };
3static const char *prevsong[] = { "mpc", "prev", NULL };
Then:
1{ 0, XF86XK_AudioPlay, spawn, { .v = playpause } },
2{ 0, XF86XK_AudioPrev, spawn, { .v = prevsong } },
3{ 0, XF86XK_AudioNext, spawn, { .v = nextsong } },
Alternatively, if you’d like to be able to control all of your media through the media keys, including MPD, then you’ll need a package generally named something along the lines of mpDris (it allows you to control MPD with MPRIS). Install that, then we’ll make it work in the following section.
Are you not a user of MPD?
Install a package, generally known as playerctl. We’ll use the following commands:
playerctl play-pauseplayerctl nextplayerctl previous
1static const char *playpause[] = { "playerctl", "play-pause", NULL };
2static const char *nextsong[] = { "playerctl", "next", NULL };
3static const char *prevsong[] = { "playerctl", "previous", NULL };
Then bind these commands to the appropriate keys, as shown here.
Chaining commands to a single key
If you want to chain multiple commands to a single key, you can simply define individual commands for the things you’d like to do, then bind both of those commands to the same key. Here’s an example:
1{ 0, XF86XK_Eject, spawn, { .v = zero_brightness } },
2{ 0, XF86XK_Eject, spawn, { .v = lock } },
The code above will lock the screen and set the backlight to zero.
Other information
That’s function keys set up.
If you want a list of the names of all of the function keys, check out the XF86 keyboard symbols.
If you’d like to figure out the name of a specific key, install and run xev. Run that from a terminal, and check the output. You’re going to have to do some digging to find the name of the currently pressed key in the output.
Be careful though! Moving your mouse is also going to show output in this program.
Autostart
Do you use a display manager?
Plop your startup instructions in ~/.xprofile.
Do you not use a display manager?
Plop your startup instructions in ~/.xinitrc.
Plopping your startup instructions
It’s the same procedure whether or not you use a display manager. You literally just list a bunch of shell commands. Here’s mine:
1# Autostart Section
2sct 5500
3/usr/bin/setxkbpmap -option "ctrl:swapcaps"
4nitrogen --restore
Ensure your .xprofile or .xinitrc is executable!
Starting DWM
Do you use a display manager?
You’ll need to create a file. Let’s call it dwm.desktop. Put the following content in it:
1[Desktop Entry]
2Encoding=UTF-8
3Name=DWM
4Comment=Dynamic Window Manager
5Exec=/usr/locla/bin/dwm
6Type=XSession
Place this file in /usr/share/xsessions. Then select DWM from your display manager.
Do you not use a display manager?
We’ll put this in ~/.xinitrc:
1exec /usr/local/bin/dwmThen, whenever you login to your TTY, simply type startx. Beware that commands placed after this line will not run, think of this as the EOF of your .xinitrc.
DBUS
If you’re having issues with DBUS on DWM specifically, such as apps not starting or MRPIS not working, then there’s probably something to do with DBUS.
I had this issue, and this is how I solved it. Since I don’t use a display manager, I just put the following into ~/.xinitrc:
1exec dbus-launch --exit-with-session /usr/local/bin/dwmI suspect you could do the same in your dwm.desktop file, but I am not sure.
Status bar
If you don’t want to use any of the new-fangled status bars, you can do the following.
Firstly, install xsetroot.
We’ll set up a loop in your .xinitrc or .xprofile. This is my loop as of now:
1while true; do
2 xsetroot -name "$( playerctl metadata --format '{{ artist }} - {{ album }} - {{ title }} | $( date + '%F %R:%S' )"
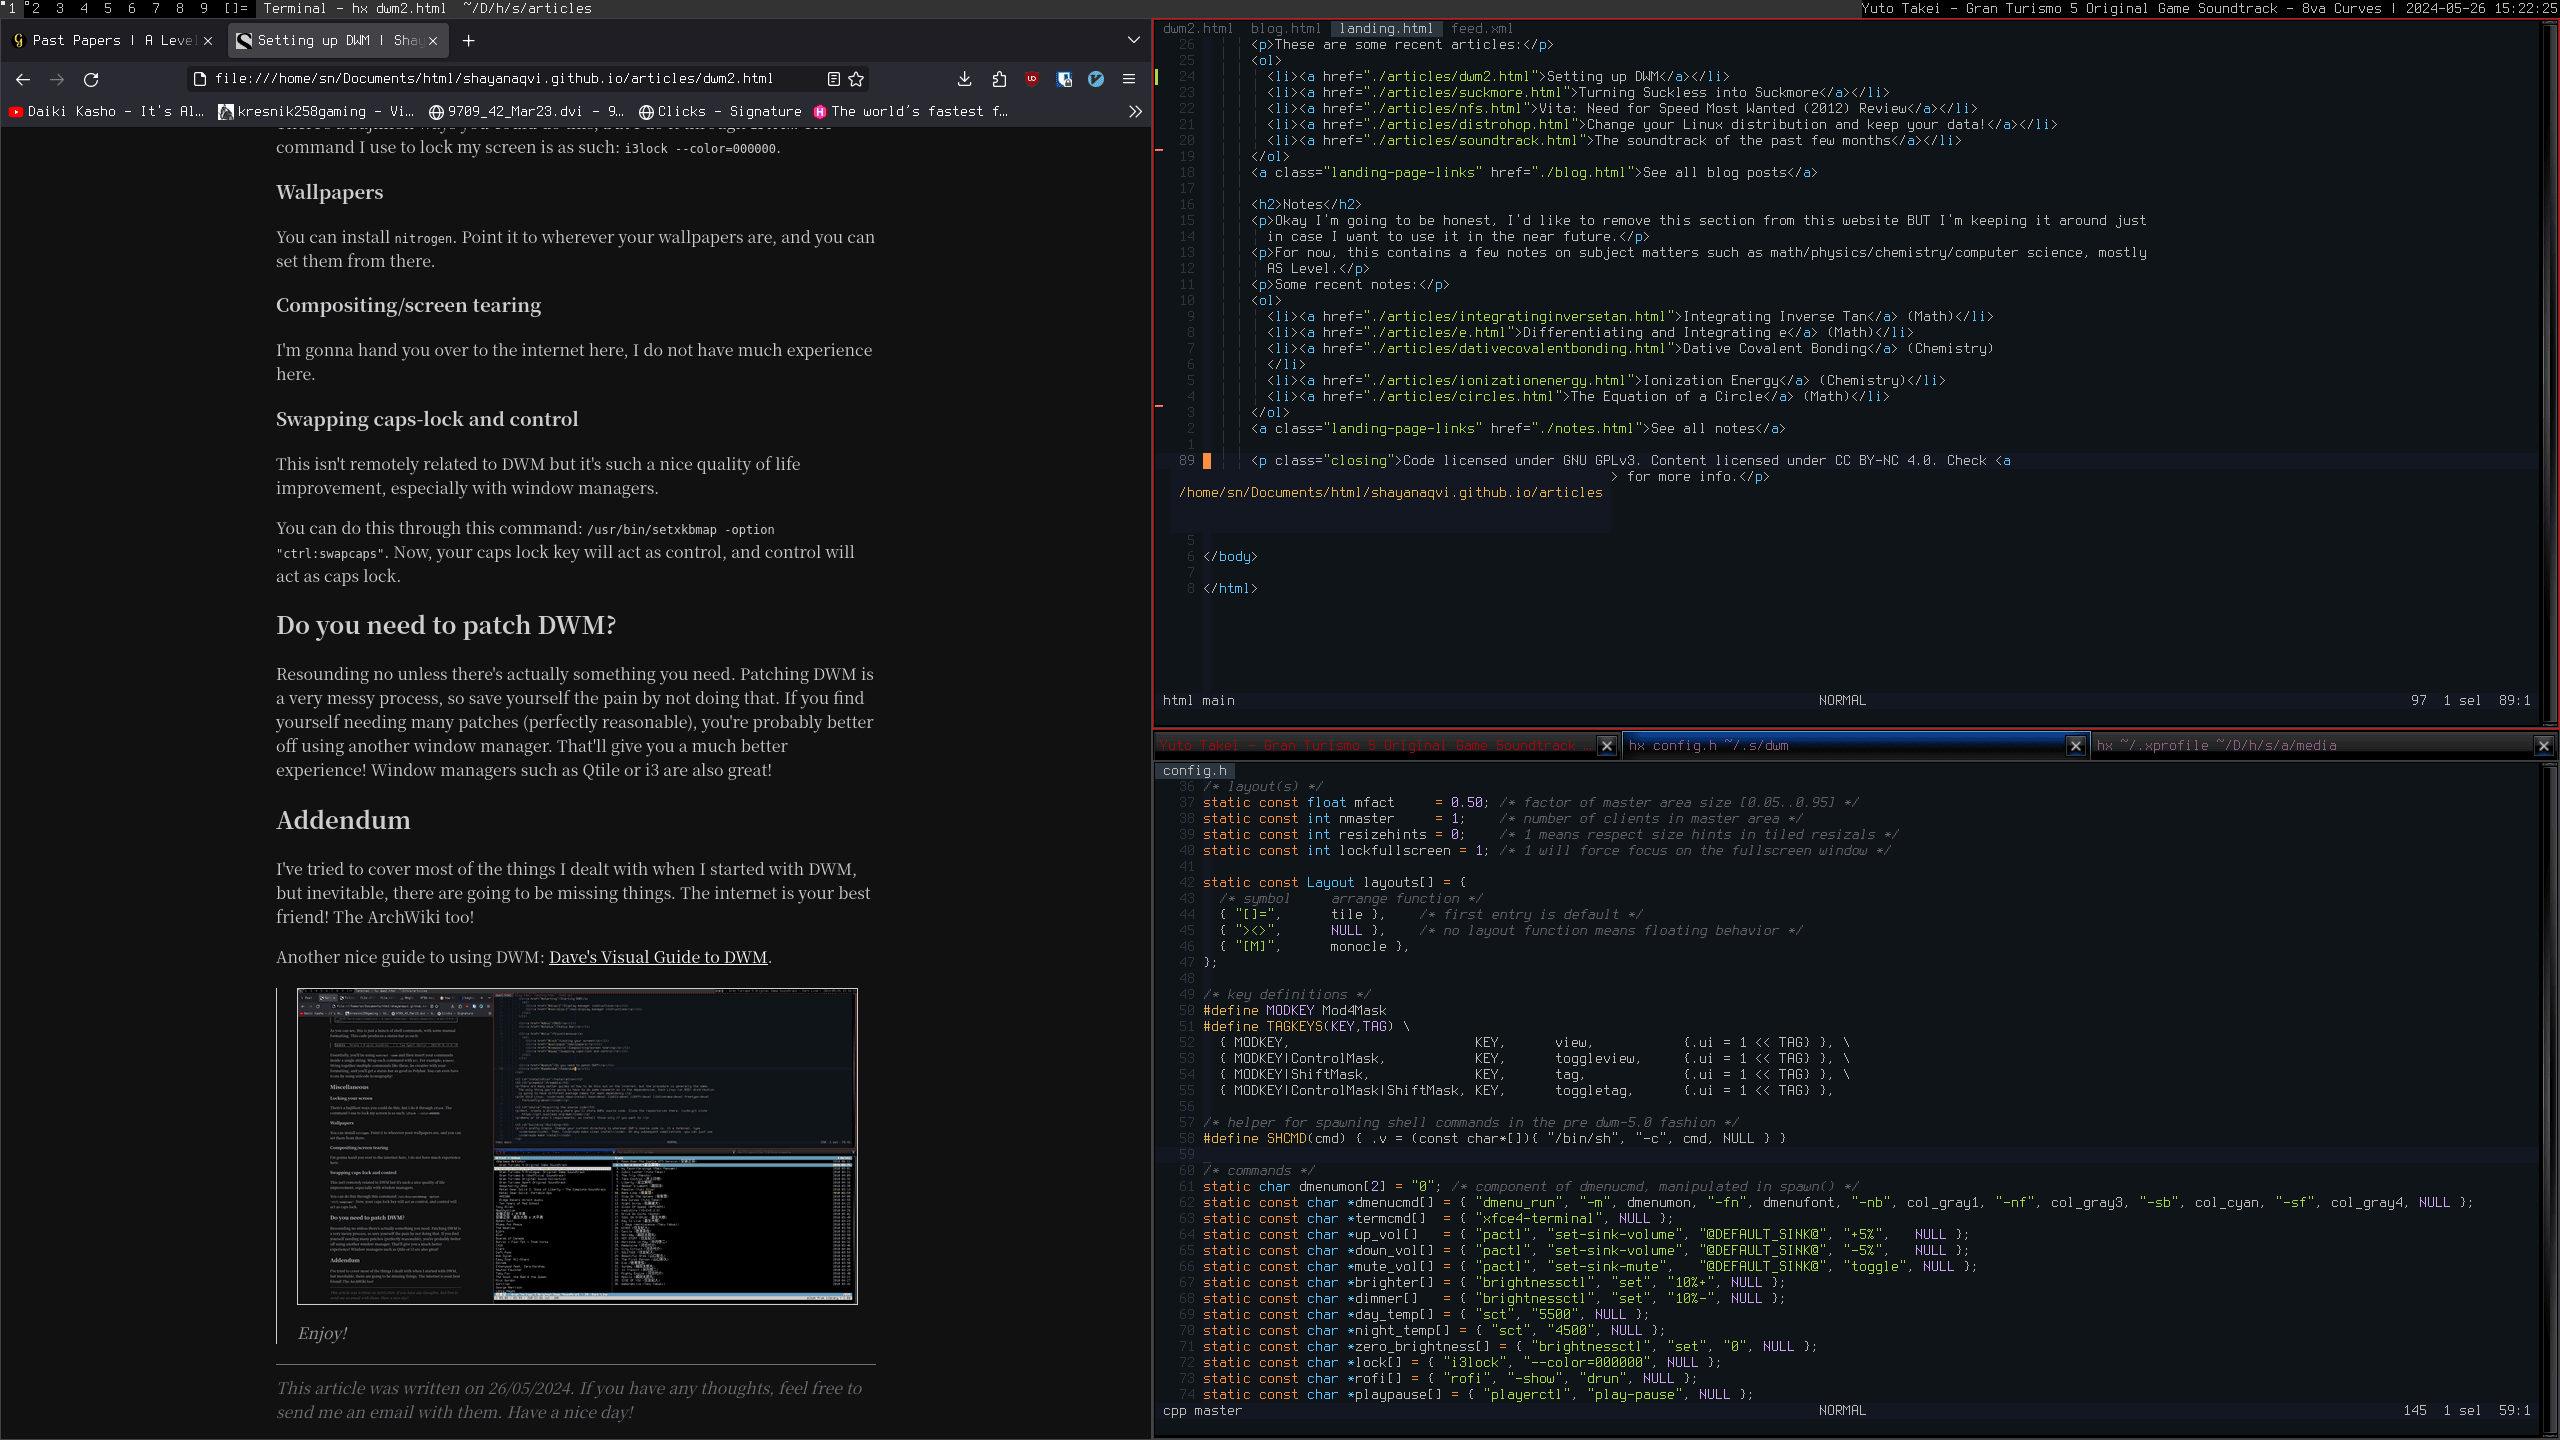
3done &As you can see, this is just a bunch of shell commands, with some manual formatting. This code produces a status bar as such:

Essentially, you’ll be using xsetroot -name and then insert your commands inside a single string. Wrap each command with $(). For example, $(date). String together multiple commands like these, be creative with your formatting, and you’ll get a pretty good status bar. You can even have icons by using unicode iconography!
Miscellaneous
Locking your screen
There’s a bajillion ways you could do this, but I do it through i3lock. The command I use to lock my screen is as such: i3lock --color=000000.
Wallpapers
You can install nitrogen. Point it to wherever your wallpapers are, and you can set them from there.
Compositing/screen tearing
Screen tearing is an issue you’ll find on window managers if you don’t use a compositor. Unfortunately, I do not have much experience here, so I’m gonna hand you over to the internet.
Swapping caps-lock and control
This isn’t remotely related to DWM but it’s such a nice quality of life improvement, especially with window managers.
You can do this through this command: /usr/bin/setxkbmap -option "ctrl:swapcaps". Now, your caps lock key will act as control, and control will act as caps lock. You can place this command in your ~/.xprofile or ~/.xinitrc to have it execute when you log in.
Do you need to patch DWM?
Resounding no unless there’s actually something you need. Patching DWM is a very messy process, so save yourself the pain by not doing that. If you find yourself needing many patches (perfectly reasonable), you’re probably better off using another window manager. That’ll give you a much better experience! Window managers such as Qtile or i3 are also great!
Addendum
I’ve tried to cover most of the things I dealt with when I started with DWM, but inevitably, there are going to be missing things. The internet is your best friend! The ArchWiki too!
A nice guide to actually using DWM: Dave’s Visual Guide to DWM.
Enjoy!